3D-Wurm-Controller-Tutorial für Unity
In diesem Tutorial zeige ich, wie man einen einfachen Wurm-Controller in Unity erstellt, inspiriert von der Tutorial-Reihe TornadoTwins für Einsteiger in die Spieleentwicklung.
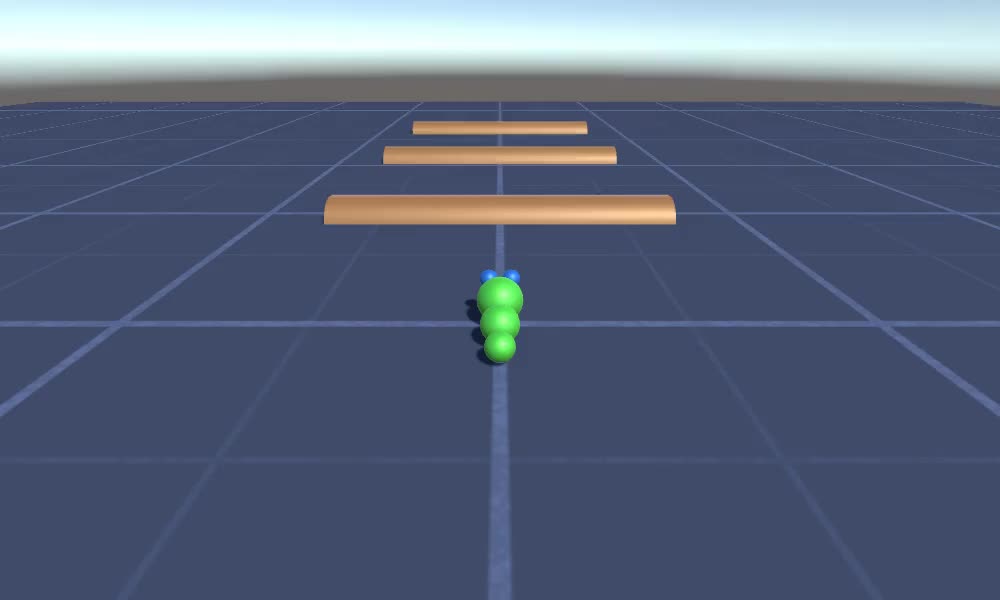
Der Wurm-Controller gleitet mit einem sanften Schwanzfolgeeffekt umher und hat die Fähigkeit zu springen.
Die Skripte in diesem Tutorial wurden ursprünglich in JavaScript (auch bekannt als UnityScript) geschrieben, das nicht mehr unterstützt wird, daher werde ich eine C#-Alternative bereitstellen.
Um einen Wurm-Controller in Unity zu erstellen, benötigen wir:
- Erstellen Sie die erforderlichen Skripte
- Erstelle einen Wurmcharakter
- Weisen Sie dem Charakter die Skripte zu
Schritt 1: Erstellen Sie alle erforderlichen Skripte
Beginnen wir mit der Erstellung aller Skripte, die zum Einrichten eines Wurm-Controllers erforderlich sind:
- Erstellen Sie ein neues Skript, nennen Sie es "SC_WormController" und fügen Sie den folgenden Code darin ein:
SC_WormController.cs
using System.Collections;
using System.Collections.Generic;
using UnityEngine;

[RequireComponent(typeof(CharacterController))]
public class SC_WormController : MonoBehaviour
{
    public float speed = 3.0f;
    public float rotateSpeed = 1.0f;
    public float jumpSpeed = 5.0f;
    public float gravity = 9.8f;

    CharacterController controller;
    Vector3 moveDirection;

    // Start is called before the first frame update
    void Start()
    {
        controller = GetComponent<CharacterController>();
    }

    // Update is called once per frame
    void Update()
    {
        // Rotate around y - axis
        transform.Rotate(0, Input.GetAxis("Horizontal") * rotateSpeed, 0);

        // Move forward / backward
        Vector3 forward = transform.TransformDirection(Vector3.forward);
        float curSpeed = speed * Input.GetAxis("Vertical");
        float movementDirectionY = moveDirection.y;
        moveDirection = forward * curSpeed;

        // Jumping
        if (Input.GetButtonDown("Jump") && controller.isGrounded)
        {
            moveDirection.y = jumpSpeed;
        }
        else
        {
            moveDirection.y = movementDirectionY;
        }

        // Apply gravity. Gravity is multiplied by deltaTime twice (once here, and once below
        // when the moveDirection is multiplied by deltaTime). This is because gravity should be applied
        // as an acceleration (ms^-2)
        if (!controller.isGrounded)
        {
            moveDirection.y -= gravity * Time.deltaTime;
        }

        // Move the controller
        controller.Move(moveDirection * Time.deltaTime);
    }
}- Erstellen Sie ein neues Skript, nennen Sie es "SC_CameraFollow" und fügen Sie den folgenden Code ein:
SC_CameraFollow.cs
using System.Collections;
using System.Collections.Generic;
using UnityEngine;

public class SC_CameraFollow : MonoBehaviour
{
    /*
    This camera smoothers out rotation around the y-axis and height.
    Horizontal Distance to the target is always fixed.

    There are many different ways to smooth the rotation but doing it this way gives you a lot of control over how the camera behaves.

    For every of those smoothed values we calculate the wanted value and the current value.
    Then we smooth it using the Lerp function.
    Then we apply the smoothed values to the transform's position.
    */

    // The target we are following
    public Transform target;
    // The distance in the x-z plane to the target
    public float distance = 10.0f;
    // the height we want the camera to be above the target
    public float height = 5.0f;
    // How much we
    public float heightDamping = 2.0f;
    public float rotationDamping = 3.0f;

    void LateUpdate()
    {
        // Early out if we don't have a target
        if (!target)
            return;

        // Calculate the current rotation angles
        float wantedRotationAngle = target.eulerAngles.y;
        float wantedHeight = target.position.y + height;
        float currentRotationAngle = transform.eulerAngles.y;
        float currentHeight = transform.position.y;

        // Damp the rotation around the y-axis
        currentRotationAngle = Mathf.LerpAngle(currentRotationAngle, wantedRotationAngle, rotationDamping * Time.deltaTime);

        // Damp the height
        currentHeight = Mathf.Lerp(currentHeight, wantedHeight, heightDamping * Time.deltaTime);

        // Convert the angle into a rotation
        Quaternion currentRotation = Quaternion.Euler(0, currentRotationAngle, 0);

        // Set the position of the camera on the x-z plane to:
        // distance meters behind the target
        transform.position = target.position;
        transform.position -= currentRotation * Vector3.forward * distance;

        // Set the height of the camera
        transform.position = new Vector3(transform.position.x, currentHeight, transform.position.z);

        // Always look at the target
        transform.LookAt(target);
    }
}- Erstellen ein neues Skript, nennen Sie es "SC_SmoothFollow" und fügen Sie den folgenden Code darin ein:
SC_SmoothFollow.cs
using System.Collections;
using System.Collections.Generic;
using UnityEngine;

public class SC_SmoothFollow : MonoBehaviour
{
    // The target we are following
    public Transform target;
    // The distance in the x-z plane to the target
    public float distance = 10.0f;
    // the height we want the camera to be above the target
    public float height = 5.0f;
    // How much we
    public float heightDamping = 2.0f;
    public float rotationDamping = 3.0f;

    // Start is called before the first frame update
    void Start()
    {
        if (!target) return;

        transform.LookAt(target);
    }

    void LateUpdate()
    {
        // Early out if we don't have a target
        if (!target) return;

        // Calculate the current rotation angles
        float wantedRotationAngle = target.eulerAngles.y;
        float wantedHeight = target.position.y + height;

        float currentRotationAngle = transform.eulerAngles.y;
        float currentHeight = transform.position.y;

        // Damp the rotation around the y-axis
        currentRotationAngle = Mathf.LerpAngle(currentRotationAngle, wantedRotationAngle, rotationDamping * Time.deltaTime);

        // Damp the height
        currentHeight = Mathf.Lerp(currentHeight, wantedHeight, heightDamping * Time.deltaTime);

        // Convert the angle into a rotation
        var currentRotation = Quaternion.Euler(0, currentRotationAngle, 0);

        // Set the position of the camera on the x-z plane to:
        // distance meters behind the target
        transform.position = target.position;
        transform.position -= currentRotation * Vector3.forward * distance;

        // Set the height of the camera
        transform.position = new Vector3(transform.position.x, currentHeight, transform.position.z);

        // Always look at the target
        transform.LookAt(target);
    }
}
Schritt 2: Erstellen Sie einen Wurmcharakter
Der nächste Schritt besteht darin, einen Wurmcharakter zu erstellen:
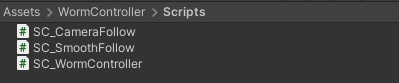
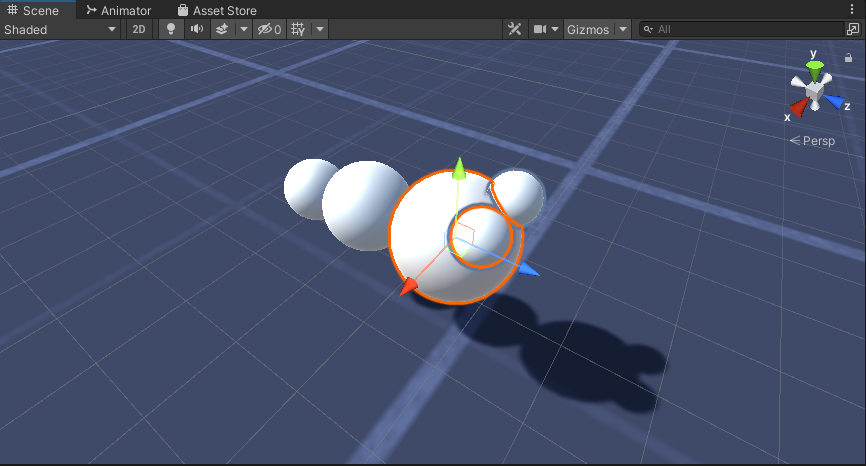
- Erstellen Sie eine neue Kugel (GameObject -> 3D-Objekt -> Kugel), ändern Sie ihre Position in (0, 0, 0), löschen Sie ihre SphereCollider-Komponente und benennen Sie sie in um "Worm"
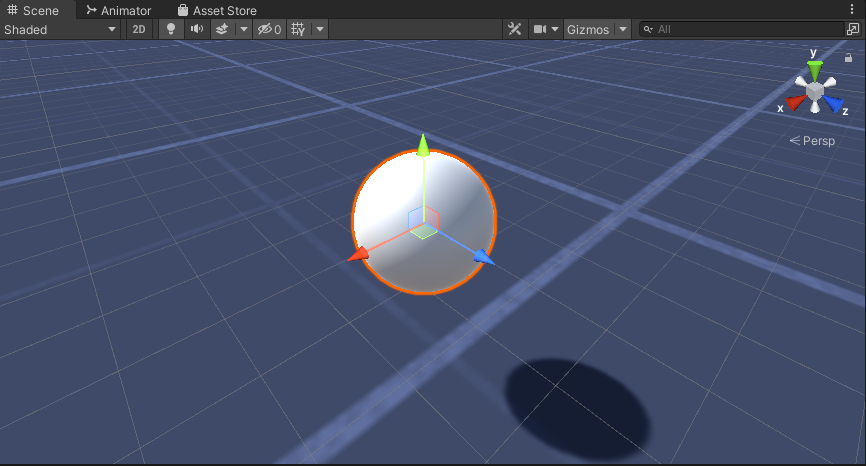
- Duplizieren Sie die "Worm"-Kugel, benennen Sie sie in "BodyPart1" um, ändern Sie ihre Position in (0, -0,1, -0,9) und ändern Sie ihre Skalierung in (0,8, 0,8, 0,8).
- Duplizieren Sie die "Worm"-Kugel erneut, benennen Sie sie in "BodyPart2" um, ändern Sie ihre Position in (0, -0,2, -1,6) und ändern Sie ihre Skalierung in (0,6, 0,6, 0,6).
- Klicken Sie mit der rechten Maustaste auf das Objekt "Worm" -> Leere erstellen und benennen Sie das neu erstellte Objekt in um "Eyes"
- Duplizieren Sie die "BodyPart2"-Kugel, benennen Sie sie in "Eye" um und verschieben Sie sie innerhalb des "Eyes"-Objekts, ändern Sie ihre Position in (-0,24, 0,353, 0,324) und ändern Sie ihre Skalierung in (0,4, 0,4, 0,4).
- Duplizieren Sie die "Eye"-Kugel und ändern Sie ihre X-Position auf 0,24
- Für die Visualisierung können Sie einige Materialien erstellen, zum Beispiel Grün für den Körper und Blau für die Augen.
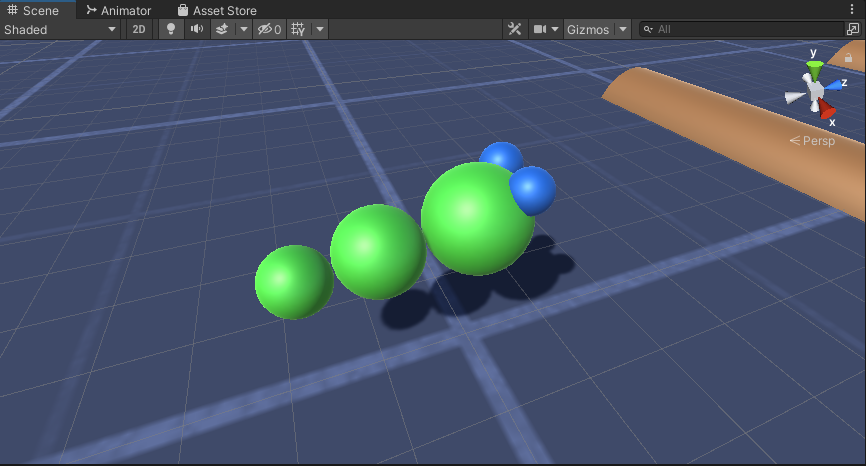
Der Wurm-Charakter ist fertig.
Schritt 3: Richten Sie den Wurmcontroller ein
Im letzten Schritt erfolgt die Zuweisung der Skripte:
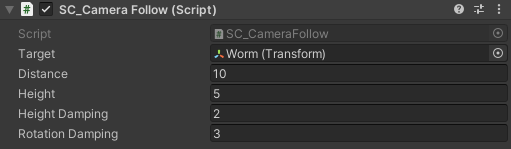
- Hängen Sie das SC_CameraFollow-Skript an das Hauptkameraobjekt an und weisen Sie die "Worm"-Kugel der Zielvariablen zu:
- Hängen Sie das SC_WormController-Skript an die "Worm"-Sphäre an (es wird automatisch eine weitere Komponente namens CharacterController hinzugefügt):
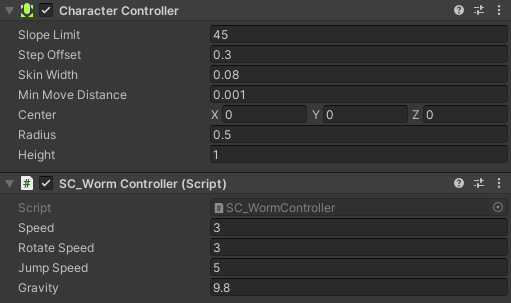
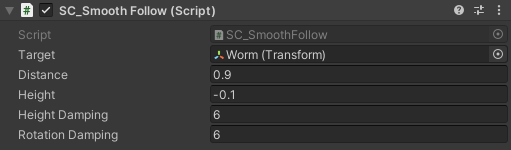
- Hängen Sie das SC_SmoothFollow-Skript an die "BodyPart1"-Kugel an und legen Sie ihre Werte auf die gleichen Werte wie im Screenshot unten fest:
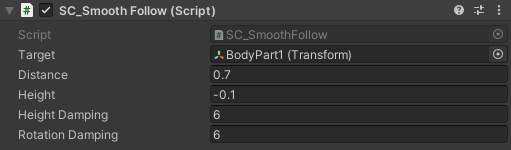
- Hängen Sie das SC_SmoothFollow-Skript an die "BodyPart2"-Kugel an und legen Sie ihre Werte auf die gleichen wie im Screenshot unten fest:
Der Controller ist jetzt bereit. Verwenden Sie W, A, S und D, um sich zu bewegen, und die Leertaste, um zu springen.
Das Quellpaket Unity ist unten verfügbar.