Türskripte für die Einheit
In diesem Tutorial zeige ich, wie man eine klassische Tür und eine Schiebetür in Unity herstellt.
Klassische Tür
Eine klassische Tür ist eine normale Tür, die durch Drehen um ihre Scharniere geöffnet wird.
Schritte
Um eine normale Tür in Unity zu erstellen, führen Sie die folgenden Schritte aus:
- Erstellen ein neues Skript, nennen Sie es 'SC_DoorScript', entfernen Sie alles daraus und fügen Sie dann den folgenden Code ein:
SC_DoorScript.cs
//Make an empty GameObject and call it "Door"
//Drag and drop your Door model into Scene and rename it to "Body"
//Make sure that the "Door" Object is at the side of the "Body" object (The place where a Door Hinge should be)
//Move the "Body" Object inside "Door"
//Add a Collider (preferably SphereCollider) to "Door" object and make it bigger then the "Body" model
//Assign this script to a "Door" Object (the one with a Trigger Collider)
//Make sure the main Character is tagged "Player"
//Upon walking into trigger area press "F" to open / close the door

using UnityEngine;

public class SC_DoorScript : MonoBehaviour
{
    // Smoothly open a door
    public AnimationCurve openSpeedCurve = new AnimationCurve(new Keyframe[] { new Keyframe(0, 1, 0, 0), new Keyframe(0.8f, 1, 0, 0), new Keyframe(1, 0, 0, 0) }); //Contols the open speed at a specific time (ex. the door opens fast at the start then slows down at the end)
    public float openSpeedMultiplier = 2.0f; //Increasing this value will make the door open faster
    public float doorOpenAngle = 90.0f; //Global door open speed that will multiply the openSpeedCurve

    bool open = false;
    bool enter = false;

    float defaultRotationAngle;
    float currentRotationAngle;
    float openTime = 0;

    void Start()
    {
        defaultRotationAngle = transform.localEulerAngles.y;
        currentRotationAngle = transform.localEulerAngles.y;

        //Set Collider as trigger
        GetComponent<Collider>().isTrigger = true;
    }

    // Main function
    void Update()
    {
        if (openTime < 1)
        {
            openTime += Time.deltaTime * openSpeedMultiplier * openSpeedCurve.Evaluate(openTime);
        }
        transform.localEulerAngles = new Vector3(transform.localEulerAngles.x, Mathf.LerpAngle(currentRotationAngle, defaultRotationAngle + (open ? doorOpenAngle : 0), openTime), transform.localEulerAngles.z);

        if (Input.GetKeyDown(KeyCode.F) && enter)
        {
            open = !open;
            currentRotationAngle = transform.localEulerAngles.y;
            openTime = 0;
        }
    }

    // Display a simple info message when player is inside the trigger area (This is for testing purposes only so you can remove it)
    void OnGUI()
    {
        if (enter)
        {
            GUI.Label(new Rect(Screen.width / 2 - 75, Screen.height - 100, 155, 30), "Press 'F' to " + (open ? "close" : "open") + " the door");
        }
    }
    //

    // Activate the Main function when Player enter the trigger area
    void OnTriggerEnter(Collider other)
    {
        if (other.CompareTag("Player"))
        {
            enter = true;
        }
    }

    // Deactivate the Main function when Player exit the trigger area
    void OnTriggerExit(Collider other)
    {
        if (other.CompareTag("Player"))
        {
            enter = false;
        }
    }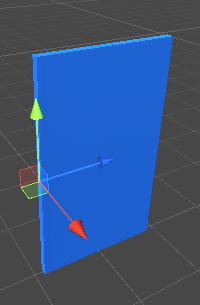
}- Ziehen Sie Ihr Türmodell per Drag & Drop in die Szenenansicht (oder erstellen Sie einen neuen Würfel und skalieren Sie ihn so, dass er einer Tür ähnelt).
- Erstellen Sie ein neues GameObject (GameObject -> Create Empty) und benennen Sie es "Door"
- Bewegen Sie das Objekt "Door" an die Position, an der sich das Türscharnier befinden sollte
- Befestigen eine SphereCollider-Komponente an dem "Door"-Objekt und ändern Sie ihren Radius, sodass es größer als eine Tür ist (dies ist der Bereich, von dem aus der Spieler die Tür öffnen kann).
- Verschieben Sie Ihr Türmodell in das "Door"-Objekt
- Stellen Sie sicher, dass Ihr Player mit dem Tag versehen ist "Player"
- Wenn Sie den Auslösebereich betreten, sollten Sie die Tür durch Drücken von 'F' öffnen/schließen können.
Schiebetür
Eine Schiebetür ist eine Tür, die sich durch Schieben in eine bestimmte Richtung öffnet (z. B. nach oben, unten, links oder rechts) und wird häufig in Science-Fiction-Levels verwendet.
Schritte
Um eine Schiebetür in Unity herzustellen, führen Sie die folgenden Schritte aus:
- Erstellen Sie ein neues Skript, nennen Sie es 'SC_SlidingDoor', entfernen Sie alles daraus und fügen Sie dann den folgenden Code ein:
SC_SlidingDoor.cs
//Make an empty GameObject and call it "SlidingDoor"
//Drag and drop your Door model into Scene and rename it to "Body"
//Move the "Body" Object inside "SlidingDoor"
//Add a Collider (preferably SphereCollider) to "SlidingDoor" Object and make it bigger then the "Body" model
//Assign this script to a "SlidingDoor" Object (the one with a Trigger Collider)
//Make sure the main Character is tagged "Player"
//Upon walking into trigger area the door should Open automatically

using UnityEngine;

public class SC_SlidingDoor : MonoBehaviour
{
    // Sliding door
    public AnimationCurve openSpeedCurve = new AnimationCurve(new Keyframe[] { new Keyframe(0, 1, 0, 0), new Keyframe(0.8f, 1, 0, 0), new Keyframe(1, 0, 0, 0) }); //Contols the open speed at a specific time (ex. the door opens fast at the start then slows down at the end)
    public enum OpenDirection { x, y, z }
    public OpenDirection direction = OpenDirection.y;
    public float openDistance = 3f; //How far should door slide (change direction by entering either a positive or a negative value)
    public float openSpeedMultiplier = 2.0f; //Increasing this value will make the door open faster
    public Transform doorBody; //Door body Transform

    bool open = false;

    Vector3 defaultDoorPosition;
    Vector3 currentDoorPosition;
    float openTime = 0;

    void Start()
    {
        if (doorBody)
        {
            defaultDoorPosition = doorBody.localPosition;
        }

        //Set Collider as trigger
        GetComponent<Collider>().isTrigger = true;
    }

    // Main function
    void Update()
    {
        if (!doorBody)
            return;

        if (openTime < 1)
        {
            openTime += Time.deltaTime * openSpeedMultiplier * openSpeedCurve.Evaluate(openTime);
        }

        if (direction == OpenDirection.x)
        {
            doorBody.localPosition = new Vector3(Mathf.Lerp(currentDoorPosition.x, defaultDoorPosition.x + (open ? openDistance : 0), openTime), doorBody.localPosition.y, doorBody.localPosition.z);
        }
        else if (direction == OpenDirection.y)
        {
            doorBody.localPosition = new Vector3(doorBody.localPosition.x, Mathf.Lerp(currentDoorPosition.y, defaultDoorPosition.y + (open ? openDistance : 0), openTime), doorBody.localPosition.z);
        }
        else if (direction == OpenDirection.z)
        {
            doorBody.localPosition = new Vector3(doorBody.localPosition.x, doorBody.localPosition.y, Mathf.Lerp(currentDoorPosition.z, defaultDoorPosition.z + (open ? openDistance : 0), openTime));
        }
    }

    // Activate the Main function when Player enter the trigger area
    void OnTriggerEnter(Collider other)
    {
        if (other.CompareTag("Player"))
        {
            open = true;
            currentDoorPosition = doorBody.localPosition;
            openTime = 0;
        }
    }

    // Deactivate the Main function when Player exit the trigger area
    void OnTriggerExit(Collider other)
    {
        if (other.CompareTag("Player"))
        {
            open = false;
            currentDoorPosition = doorBody.localPosition;
            openTime = 0;
        }
    }
}- Ziehen Sie Ihr Türmodell per Drag & Drop in die Szenenansicht (oder erstellen Sie einen neuen Würfel und skalieren Sie ihn so, dass er einer Tür ähnelt).
- Erstellen Sie ein neues GameObject (GameObject -> Create Empty) und benennen Sie es "SlidingDoor"
- Bewegen Sie das Objekt "SlidingDoor" in die Mittelposition Ihres Türmodells
- Hängen Sie eine SphereCollider-Komponente an das "SlidingDoor"-Objekt an und ändern Sie seinen Radius, sodass er größer als eine Tür ist (dies ist der Bereich, der das Öffnungsereignis auslöst).
- Verschieben Sie Ihr Türmodell innerhalb des "SlidingDoor"-Objekts
- Stellen Sie sicher, dass Ihr Player mit dem Tag versehen ist "Player"
- Beim Betreten des Auslösebereichs sollte sich die Tür automatisch öffnen und wieder schließen, sobald der Spieler den Auslösebereich verlässt.