Erstellen Sie ein Multiplayer-Autospiel mit PUN 2
Ein Multiplayer-Spiel in Unity zu erstellen ist eine komplexe Aufgabe, aber glücklicherweise vereinfachen mehrere Lösungen den Entwicklungsprozess.
Eine solche Lösung ist das Photon Network. Insbesondere kümmert sich die neueste Version ihrer API namens PUN 2 um das Server-Hosting und lässt Ihnen die Freiheit, ein Multiplayer-Spiel nach Ihren Wünschen zu erstellen.
In diesem Tutorial zeige ich, wie man mit PUN 2 ein einfaches Autospiel mit Physiksynchronisation erstellt.
Unity In diesem Tutorial verwendete Version: Unity 2018.3.0f2 (64-Bit)
Teil 1: Einrichten von PUN 2
Der erste Schritt besteht darin, ein PUN 2-Paket vom Asset Store herunterzuladen. Es enthält alle für die Multiplayer-Integration erforderlichen Skripte und Dateien.
- Öffnen Sie Ihr Unity-Projekt und gehen Sie dann zu Asset Store: (Fenster -> Allgemein -> AssetStore) oder drücken Sie Strg+9
- Suchen Sie nach "PUN 2- Free" und klicken Sie dann auf das erste Ergebnis oder klicken Sie hier
- Importieren Sie das PUN 2-Paket, nachdem der Download abgeschlossen ist


- Nachdem das Paket importiert wurde, müssen Sie eine Photon-App-ID erstellen. Dies geschieht auf deren Website: https://www.photonengine.com/
- Erstellen Sie ein neues Konto (oder melden Sie sich bei Ihrem bestehenden Konto an)
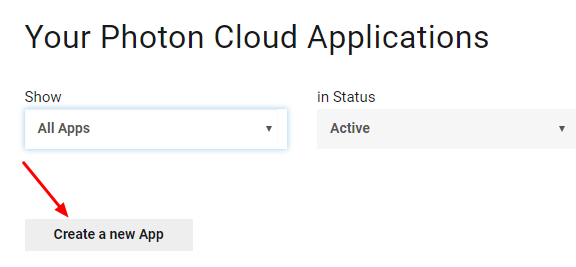
- Gehen Sie zur Seite „Anwendungen“, indem Sie auf das Profilsymbol und dann auf "Your Applications" klicken oder diesem Link folgen: https://dashboard.photonengine.com/en-US/PublicCloud
- Klicken Sie auf der Seite „Anwendungen“ auf "Create new app"
- Wählen Sie auf der Erstellungsseite als Photonentyp "Photon Realtime" aus, geben Sie als Name einen beliebigen Namen ein und klicken Sie dann "Create"
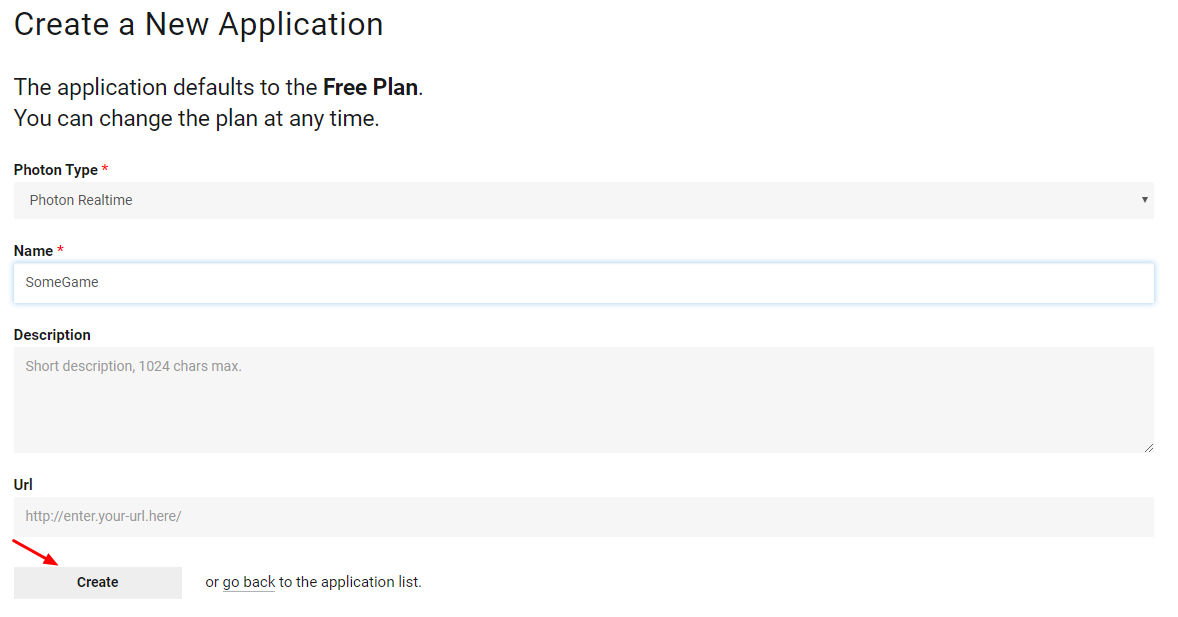
Wie Sie sehen können, verwendet die Anwendung standardmäßig den kostenlosen Plan. Weitere Informationen zu den Preisplänen finden Sie hier
- Sobald die Anwendung erstellt ist, kopieren Sie die App-ID, die sich unter dem App-Namen befindet

- Gehen Sie zurück zu Ihrem Unity-Projekt und gehen Sie dann zu Fenster -> Photon Unity-Netzwerk -> PUN-Assistent
- Klicken Sie im PUN-Assistenten auf "Setup Project", fügen Sie Ihre App-ID ein und klicken Sie dann "Setup Project"
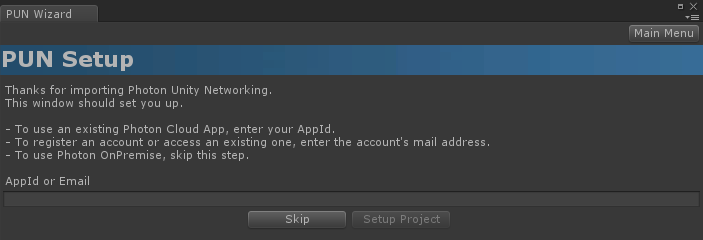
Das PUN 2 ist jetzt fertig!
Teil 2: Erstellen eines Multiplayer-Autospiels
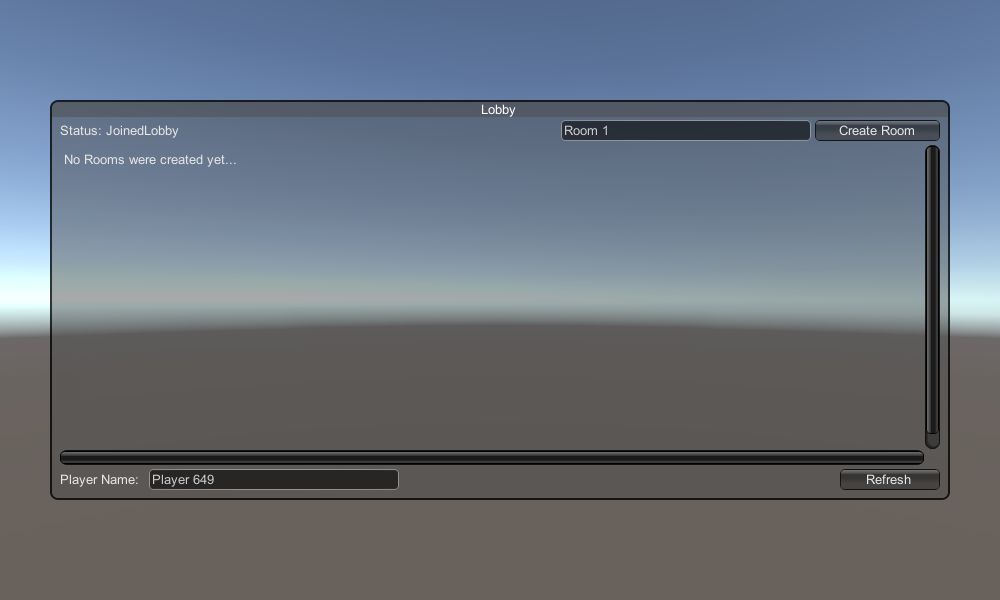
1. Eine Lobby einrichten
Beginnen wir mit der Erstellung einer Lobby-Szene, die Lobby-Logik enthält (Vorhandene Räume durchsuchen, neue Räume erstellen usw.):
- Erstellen Sie eine neue Szene und nennen Sie sie "GameLobby"
- Erstellen Sie in der "GameLobby"-Szene ein neues GameObject und nennen Sie es "_GameLobby"
- Erstellen ein neues C#-Skript, nennen Sie es "PUN2_GameLobby" und hängen Sie es dann an das "_GameLobby"-Objekt an
- Fügen Sie den folgenden Code in das "PUN2_GameLobby"-Skript ein
PUN2_GameLobby.cs
using System.Collections.Generic;
using UnityEngine;
using Photon.Pun;
using Photon.Realtime;

public class PUN2_GameLobby : MonoBehaviourPunCallbacks
{

    //Our player name
    string playerName = "Player 1";
    //Users are separated from each other by gameversion (which allows you to make breaking changes).
    string gameVersion = "1.0";
    //The list of created rooms
    List<RoomInfo> createdRooms = new List<RoomInfo>();
    //Use this name when creating a Room
    string roomName = "Room 1";
    Vector2 roomListScroll = Vector2.zero;
    bool joiningRoom = false;

    // Use this for initialization
    void Start()
    {
        //Initialize Player name
        playerName = "Player " + Random.Range(111, 999);

        //This makes sure we can use PhotonNetwork.LoadLevel() on the master client and all clients in the same room sync their level automatically
        PhotonNetwork.AutomaticallySyncScene = true;

        if (!PhotonNetwork.IsConnected)
        {
            //Set the App version before connecting
            PhotonNetwork.PhotonServerSettings.AppSettings.AppVersion = gameVersion;
            PhotonNetwork.PhotonServerSettings.AppSettings.FixedRegion = "eu";
            // Connect to the photon master-server. We use the settings saved in PhotonServerSettings (a .asset file in this project)
            PhotonNetwork.ConnectUsingSettings();
        }
    }

    public override void OnDisconnected(DisconnectCause cause)
    {
        Debug.Log("OnFailedToConnectToPhoton. StatusCode: " + cause.ToString() + " ServerAddress: " + PhotonNetwork.ServerAddress);
    }

    public override void OnConnectedToMaster()
    {
        Debug.Log("OnConnectedToMaster");
        //After we connected to Master server, join the Lobby
        PhotonNetwork.JoinLobby(TypedLobby.Default);
    }

    public override void OnRoomListUpdate(List<RoomInfo> roomList)
    {
        Debug.Log("We have received the Room list");
        //After this callback, update the room list
        createdRooms = roomList;
    }

    void OnGUI()
    {
        GUI.Window(0, new Rect(Screen.width / 2 - 450, Screen.height / 2 - 200, 900, 400), LobbyWindow, "Lobby");
    }

    void LobbyWindow(int index)
    {
        //Connection Status and Room creation Button
        GUILayout.BeginHorizontal();

        GUILayout.Label("Status: " + PhotonNetwork.NetworkClientState);

        if (joiningRoom || !PhotonNetwork.IsConnected || PhotonNetwork.NetworkClientState != ClientState.JoinedLobby)
        {
            GUI.enabled = false;
        }

        GUILayout.FlexibleSpace();

        //Room name text field
        roomName = GUILayout.TextField(roomName, GUILayout.Width(250));

        if (GUILayout.Button("Create Room", GUILayout.Width(125)))
        {
            if (roomName != "")
            {
                joiningRoom = true;

                RoomOptions roomOptions = new RoomOptions();
                roomOptions.IsOpen = true;
                roomOptions.IsVisible = true;
                roomOptions.MaxPlayers = (byte)10; //Set any number

                PhotonNetwork.JoinOrCreateRoom(roomName, roomOptions, TypedLobby.Default);
            }
        }

        GUILayout.EndHorizontal();

        //Scroll through available rooms
        roomListScroll = GUILayout.BeginScrollView(roomListScroll, true, true);

        if (createdRooms.Count == 0)
        {
            GUILayout.Label("No Rooms were created yet...");
        }
        else
        {
            for (int i = 0; i < createdRooms.Count; i++)
            {
                GUILayout.BeginHorizontal("box");
                GUILayout.Label(createdRooms[i].Name, GUILayout.Width(400));
                GUILayout.Label(createdRooms[i].PlayerCount + "/" + createdRooms[i].MaxPlayers);

                GUILayout.FlexibleSpace();

                if (GUILayout.Button("Join Room"))
                {
                    joiningRoom = true;

                    //Set our Player name
                    PhotonNetwork.NickName = playerName;

                    //Join the Room
                    PhotonNetwork.JoinRoom(createdRooms[i].Name);
                }
                GUILayout.EndHorizontal();
            }
        }

        GUILayout.EndScrollView();

        //Set player name and Refresh Room button
        GUILayout.BeginHorizontal();

        GUILayout.Label("Player Name: ", GUILayout.Width(85));
        //Player name text field
        playerName = GUILayout.TextField(playerName, GUILayout.Width(250));

        GUILayout.FlexibleSpace();

        GUI.enabled = (PhotonNetwork.NetworkClientState == ClientState.JoinedLobby || PhotonNetwork.NetworkClientState == ClientState.Disconnected) && !joiningRoom;
        if (GUILayout.Button("Refresh", GUILayout.Width(100)))
        {
            if (PhotonNetwork.IsConnected)
            {
                //Re-join Lobby to get the latest Room list
                PhotonNetwork.JoinLobby(TypedLobby.Default);
            }
            else
            {
                //We are not connected, estabilish a new connection
                PhotonNetwork.ConnectUsingSettings();
            }
        }

        GUILayout.EndHorizontal();

        if (joiningRoom)
        {
            GUI.enabled = true;
            GUI.Label(new Rect(900 / 2 - 50, 400 / 2 - 10, 100, 20), "Connecting...");
        }
    }

    public override void OnCreateRoomFailed(short returnCode, string message)
    {
        Debug.Log("OnCreateRoomFailed got called. This can happen if the room exists (even if not visible). Try another room name.");
        joiningRoom = false;
    }

    public override void OnJoinRoomFailed(short returnCode, string message)
    {
        Debug.Log("OnJoinRoomFailed got called. This can happen if the room is not existing or full or closed.");
        joiningRoom = false;
    }

    public override void OnJoinRandomFailed(short returnCode, string message)
    {
        Debug.Log("OnJoinRandomFailed got called. This can happen if the room is not existing or full or closed.");
        joiningRoom = false;
    }

    public override void OnCreatedRoom()
    {
        Debug.Log("OnCreatedRoom");
        //Set our player name
        PhotonNetwork.NickName = playerName;
        //Load the Scene called Playground (Make sure it's added to build settings)
        PhotonNetwork.LoadLevel("Playground");
    }

    public override void OnJoinedRoom()
    {
        Debug.Log("OnJoinedRoom");
    }
}
2. Erstellen eines vorgefertigten Autos
Das vorgefertigte Auto wird einen einfachen physikalischen Controller verwenden.
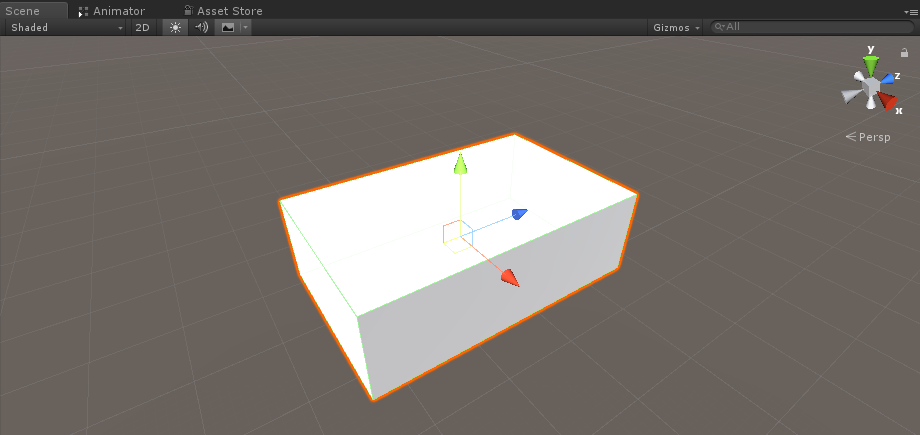
- Erstellen Sie ein neues GameObject und nennen Sie es "CarRoot"
- Erstellen Sie einen neuen Würfel, verschieben Sie ihn innerhalb des "CarRoot"-Objekts und skalieren Sie ihn dann entlang der Z- und X-Achse
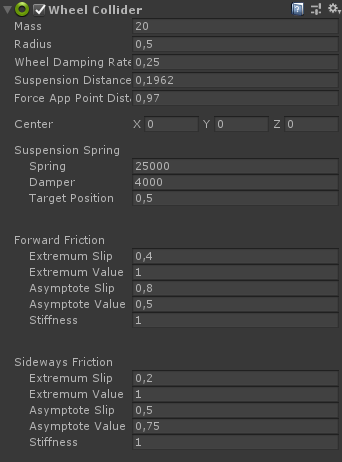
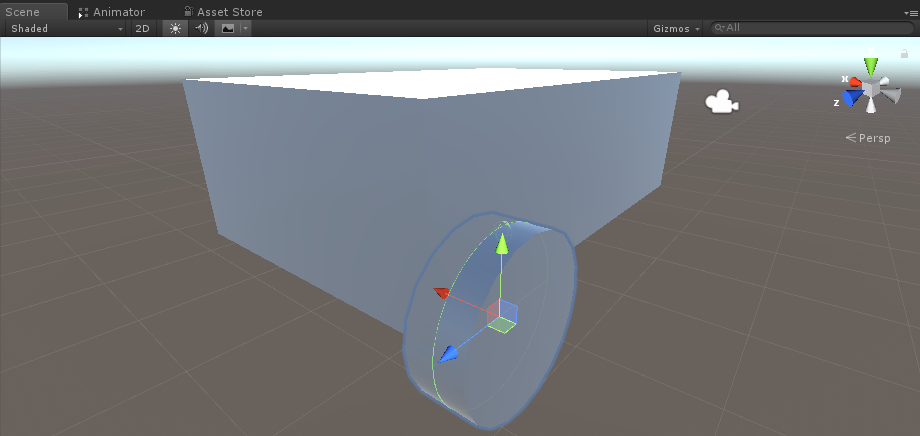
- Erstellen Sie ein neues GameObject und nennen Sie es "wfl" (Abkürzung für Wheel Front Left).
- Fügen Sie die Wheel Collider-Komponente zum "wfl"-Objekt hinzu und legen Sie die Werte aus dem Bild unten fest:
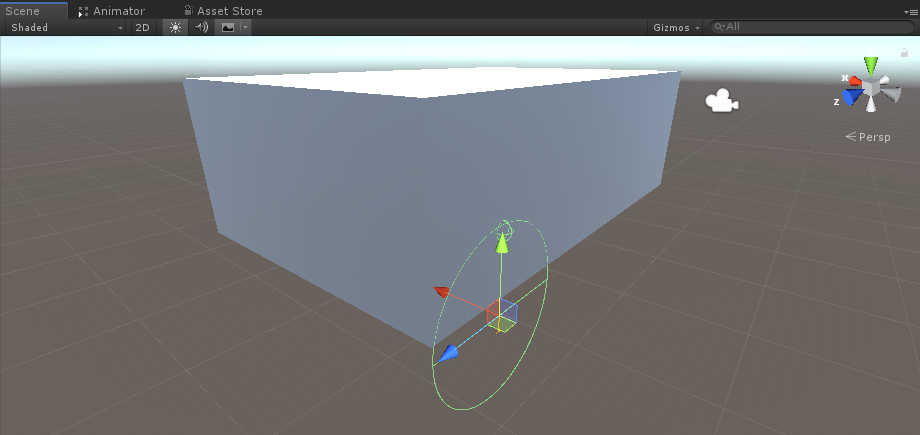
- Erstellen Sie ein neues GameObject, benennen Sie es in "WheelTransform" um und verschieben Sie es dann in das "wfl"-Objekt
- Erstellen Sie einen neuen Zylinder, verschieben Sie ihn innerhalb des "WheelTransform"-Objekts, drehen Sie ihn dann und verkleinern Sie ihn, bis er den Abmessungen des Wheel Collider entspricht. In meinem Fall ist die Skala (1, 0,17, 1)
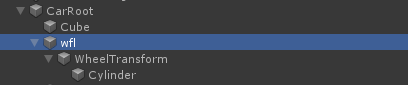
- Zum Schluss duplizieren Sie das Objekt "wfl" dreimal für die restlichen Räder und benennen jedes Objekt in "wfr" (Rad vorne rechts), "wrr" (Rad hinten rechts) bzw. "wrl" (Rad hinten links) um

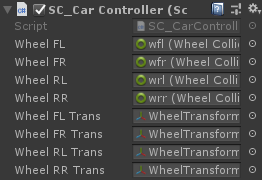
- Erstellen Sie ein neues Skript, nennen Sie es "SC_CarController" und fügen Sie dann den folgenden Code ein:
SC_CarController.cs
using UnityEngine;
using System.Collections;

public class SC_CarController : MonoBehaviour
{
    public WheelCollider WheelFL;
    public WheelCollider WheelFR;
    public WheelCollider WheelRL;
    public WheelCollider WheelRR;
    public Transform WheelFLTrans;
    public Transform WheelFRTrans;
    public Transform WheelRLTrans;
    public Transform WheelRRTrans;
    public float steeringAngle = 45;
    public float maxTorque = 1000;
    public  float maxBrakeTorque = 500;
    public Transform centerOfMass;

    float gravity = 9.8f;
    bool braked = false;
    Rigidbody rb;

    void Start()
    {
        rb = GetComponent<Rigidbody>();
        rb.centerOfMass = centerOfMass.transform.localPosition;
    }

    void FixedUpdate()
    {
        if (!braked)
        {
            WheelFL.brakeTorque = 0;
            WheelFR.brakeTorque = 0;
            WheelRL.brakeTorque = 0;
            WheelRR.brakeTorque = 0;
        }
        //Speed of car, Car will move as you will provide the input to it.

        WheelRR.motorTorque = maxTorque * Input.GetAxis("Vertical");
        WheelRL.motorTorque = maxTorque * Input.GetAxis("Vertical");

        //Changing car direction
        //Here we are changing the steer angle of the front tyres of the car so that we can change the car direction.
        WheelFL.steerAngle = steeringAngle * Input.GetAxis("Horizontal");
        WheelFR.steerAngle = steeringAngle * Input.GetAxis("Horizontal");
    }
    void Update()
    {
        HandBrake();

        //For tyre rotate
        WheelFLTrans.Rotate(WheelFL.rpm / 60 * 360 * Time.deltaTime, 0, 0);
        WheelFRTrans.Rotate(WheelFR.rpm / 60 * 360 * Time.deltaTime, 0, 0);
        WheelRLTrans.Rotate(WheelRL.rpm / 60 * 360 * Time.deltaTime, 0, 0);
        WheelRRTrans.Rotate(WheelRL.rpm / 60 * 360 * Time.deltaTime, 0, 0);
        //Changing tyre direction
        Vector3 temp = WheelFLTrans.localEulerAngles;
        Vector3 temp1 = WheelFRTrans.localEulerAngles;
        temp.y = WheelFL.steerAngle - (WheelFLTrans.localEulerAngles.z);
        WheelFLTrans.localEulerAngles = temp;
        temp1.y = WheelFR.steerAngle - WheelFRTrans.localEulerAngles.z;
        WheelFRTrans.localEulerAngles = temp1;
    }
    void HandBrake()
    {
        //Debug.Log("brakes " + braked);
        if (Input.GetButton("Jump"))
        {
            braked = true;
        }
        else
        {
            braked = false;
        }
        if (braked)
        {

            WheelRL.brakeTorque = maxBrakeTorque * 20;//0000;
            WheelRR.brakeTorque = maxBrakeTorque * 20;//0000;
            WheelRL.motorTorque = 0;
            WheelRR.motorTorque = 0;
        }
    }
}- Hängen Sie das SC_CarController-Skript an das "CarRoot"-Objekt an
- Hängen Sie die Rigidbody-Komponente an das "CarRoot"-Objekt an und ändern Sie seine Masse auf 1000
- Weisen Sie die Radvariablen in SC_CarController zu (Wheel Collider für die ersten 4 Variablen und WheelTransform für die restlichen 4).
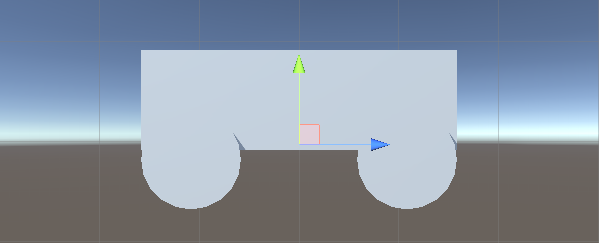
- Erstellen Sie für die Variable „Center of Mass“ ein neues GameObject, nennen Sie es "CenterOfMass" und verschieben Sie es in das Objekt "CarRoot"
- Platzieren Sie das "CenterOfMass"-Objekt in der Mitte und leicht nach unten, so:
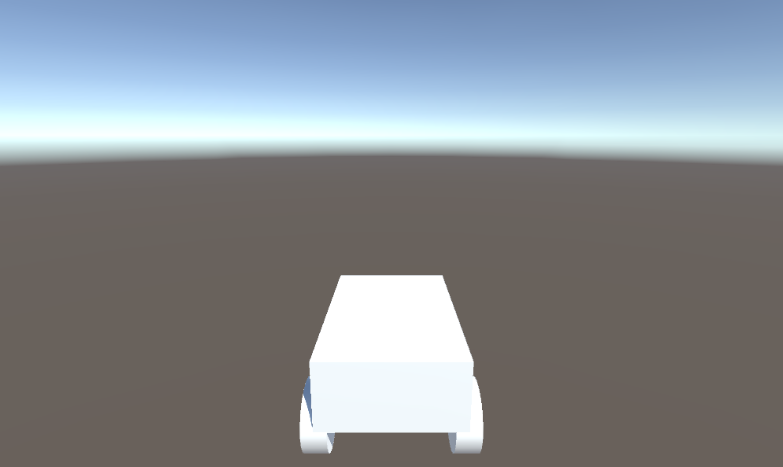
- Bewegen Sie abschließend zu Testzwecken die Hauptkamera in das "CarRoot"-Objekt und richten Sie sie auf das Auto:
- Erstellen Sie ein neues Skript, nennen Sie es "PUN2_CarSync" und fügen Sie dann den folgenden Code ein:
PUN2_CarSync.cs
using System.Collections;
using System.Collections.Generic;
using UnityEngine;
using Photon.Pun;

public class PUN2_CarSync : MonoBehaviourPun, IPunObservable
{
    public MonoBehaviour[] localScripts; //Scripts that should only be enabled for the local player (Ex. Car controller)
    public GameObject[] localObjects; //Objects that should only be active for the local player (Ex. Camera)
    public Transform[] wheels; //Car wheel transforms

    Rigidbody r;
    // Values that will be synced over network
    Vector3 latestPos;
    Quaternion latestRot;
    Vector3 latestVelocity;
    Vector3 latestAngularVelocity;
    Quaternion[] wheelRotations = new Quaternion[0];
    // Lag compensation
    float currentTime = 0;
    double currentPacketTime = 0;
    double lastPacketTime = 0;
    Vector3 positionAtLastPacket = Vector3.zero;
    Quaternion rotationAtLastPacket = Quaternion.identity;
    Vector3 velocityAtLastPacket = Vector3.zero;
    Vector3 angularVelocityAtLastPacket = Vector3.zero;

    // Use this for initialization
    void Awake()
    {
        r = GetComponent<Rigidbody>();
        r.isKinematic = !photonView.IsMine;
        for (int i = 0; i < localScripts.Length; i++)
        {
            localScripts[i].enabled = photonView.IsMine;
        }
        for (int i = 0; i < localObjects.Length; i++)
        {
            localObjects[i].SetActive(photonView.IsMine);
        }
    }

    public void OnPhotonSerializeView(PhotonStream stream, PhotonMessageInfo info)
    {
        if (stream.IsWriting)
        {
            // We own this player: send the others our data
            stream.SendNext(transform.position);
            stream.SendNext(transform.rotation);
            stream.SendNext(r.velocity);
            stream.SendNext(r.angularVelocity);

            wheelRotations = new Quaternion[wheels.Length];
            for(int i = 0; i < wheels.Length; i++)
            {
                wheelRotations[i] = wheels[i].localRotation;
            }
            stream.SendNext(wheelRotations);
        }
        else
        {
            // Network player, receive data
            latestPos = (Vector3)stream.ReceiveNext();
            latestRot = (Quaternion)stream.ReceiveNext();
            latestVelocity = (Vector3)stream.ReceiveNext();
            latestAngularVelocity = (Vector3)stream.ReceiveNext();
            wheelRotations = (Quaternion[])stream.ReceiveNext();

            // Lag compensation
            currentTime = 0.0f;
            lastPacketTime = currentPacketTime;
            currentPacketTime = info.SentServerTime;
            positionAtLastPacket = transform.position;
            rotationAtLastPacket = transform.rotation;
            velocityAtLastPacket = r.velocity;
            angularVelocityAtLastPacket = r.angularVelocity;
        }
    }

    // Update is called once per frame
    void Update()
    {
        if (!photonView.IsMine)
        {
            // Lag compensation
            double timeToReachGoal = currentPacketTime - lastPacketTime;
            currentTime += Time.deltaTime;

            // Update car position and velocity
            transform.position = Vector3.Lerp(positionAtLastPacket, latestPos, (float)(currentTime / timeToReachGoal));
            transform.rotation = Quaternion.Lerp(rotationAtLastPacket, latestRot, (float)(currentTime / timeToReachGoal));
            r.velocity = Vector3.Lerp(velocityAtLastPacket, latestVelocity, (float)(currentTime / timeToReachGoal));
            r.angularVelocity = Vector3.Lerp(angularVelocityAtLastPacket, latestAngularVelocity, (float)(currentTime / timeToReachGoal));

            //Apply wheel rotation
            if(wheelRotations.Length == wheels.Length)
            {
                for (int i = 0; i < wheelRotations.Length; i++)
                {
                    wheels[i].localRotation = Quaternion.Lerp(wheels[i].localRotation, wheelRotations[i], Time.deltaTime * 6.5f);
                }
            }
        }
    }
}- Hängen Sie das PUN2_CarSync-Skript an das "CarRoot"-Objekt an
- Hängen Sie die PhotonView-Komponente an das "CarRoot"-Objekt an
- Weisen Sie in PUN2_CarSync das SC_CarController-Skript dem Local Scripts-Array zu
- Weisen Sie in PUN2_CarSync die Kamera dem Array „Lokale Objekte“ zu
- Weisen Sie WheelTransform-Objekte dem Wheels-Array zu
- Weisen Sie abschließend das PUN2_CarSync-Skript dem Observed Components-Array in Photon View zu
- Speichern Sie das "CarRoot"-Objekt in Prefab und legen Sie es in einem Ordner namens „Ressourcen“ ab (dies ist erforderlich, um Objekte über das Netzwerk erzeugen zu können).
3. Erstellen eines Spiellevels
Game Level ist eine Szene, die nach dem Betreten des Raums geladen wird und in dem die gesamte Aktion stattfindet.
- Erstellen Sie eine neue Szene und nennen Sie sie "Playground" (Oder wenn Sie einen anderen Namen beibehalten möchten, stellen Sie sicher, dass Sie den Namen in dieser Zeile PhotonNetwork.LoadLevel("Playground"); in PUN2_GameLobby.cs ändern).
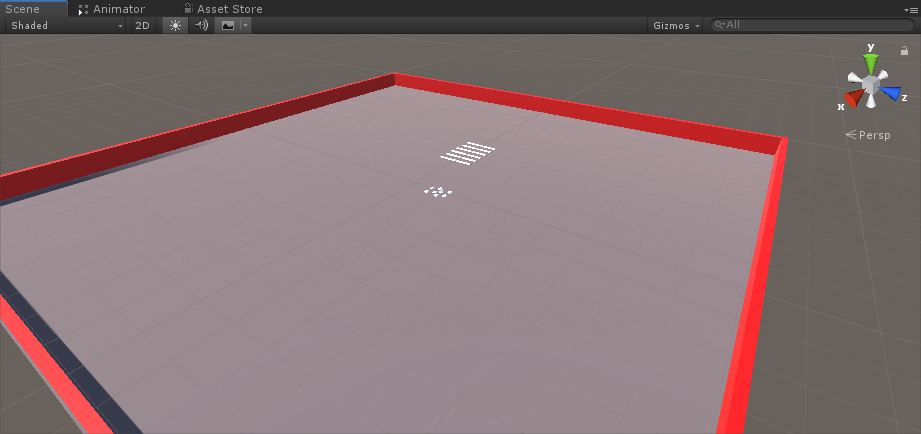
In meinem Fall verwende ich eine einfache Szene mit einer Ebene und einigen Würfeln:
- Erstellen Sie ein neues Skript und nennen Sie es PUN2_RoomController (Dieses Skript verwaltet die Logik im Raum, z. B. das Spawnen der Spieler, das Anzeigen der Spielerliste usw.) und fügen Sie dann den folgenden Code ein:
PUN2_RoomController.cs
using UnityEngine;
using Photon.Pun;

public class PUN2_RoomController : MonoBehaviourPunCallbacks
{

    //Player instance prefab, must be located in the Resources folder
    public GameObject playerPrefab;
    //Player spawn point
    public Transform[] spawnPoints;

    // Use this for initialization
    void Start()
    {
        //In case we started this demo with the wrong scene being active, simply load the menu scene
        if (PhotonNetwork.CurrentRoom == null)
        {
            Debug.Log("Is not in the room, returning back to Lobby");
            UnityEngine.SceneManagement.SceneManager.LoadScene("GameLobby");
            return;
        }

        //We're in a room. spawn a character for the local player. it gets synced by using PhotonNetwork.Instantiate
        PhotonNetwork.Instantiate(playerPrefab.name, spawnPoints[Random.Range(0, spawnPoints.Length - 1)].position, spawnPoints[Random.Range(0, spawnPoints.Length - 1)].rotation, 0);
    }

    void OnGUI()
    {
        if (PhotonNetwork.CurrentRoom == null)
            return;

        //Leave this Room
        if (GUI.Button(new Rect(5, 5, 125, 25), "Leave Room"))
        {
            PhotonNetwork.LeaveRoom();
        }

        //Show the Room name
        GUI.Label(new Rect(135, 5, 200, 25), PhotonNetwork.CurrentRoom.Name);

        //Show the list of the players connected to this Room
        for (int i = 0; i < PhotonNetwork.PlayerList.Length; i++)
        {
            //Show if this player is a Master Client. There can only be one Master Client per Room so use this to define the authoritative logic etc.)
            string isMasterClient = (PhotonNetwork.PlayerList[i].IsMasterClient ? ": MasterClient" : "");
            GUI.Label(new Rect(5, 35 + 30 * i, 200, 25), PhotonNetwork.PlayerList[i].NickName + isMasterClient);
        }
    }

    public override void OnLeftRoom()
    {
        //We have left the Room, return back to the GameLobby
        UnityEngine.SceneManagement.SceneManager.LoadScene("GameLobby");
    }
}- Erstellen Sie ein neues GameObject in der "Playground"-Szene und nennen Sie es "_RoomController"
- Hängen Sie ein PUN2_RoomController-Skript an das _RoomController-Objekt an
- Weisen Sie ein vorgefertigtes Auto und SpawnPoints zu und speichern Sie dann die Szene

- Fügen Sie den Build-Einstellungen sowohl GameLobby- als auch Playground-Szenen hinzu:

4. Erstellen eines Testaufbaus
Jetzt ist es an der Zeit, einen Build zu erstellen und ihn zu testen:
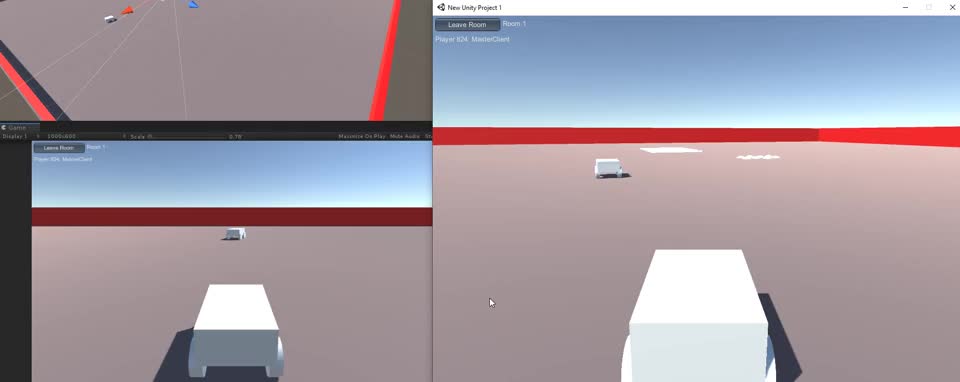
Alles funktioniert wie erwartet!